As always, a photo of the finished ensembles:
 |
| Photo by Lucas Pitcher, Timelight Photography |
The theme for 2018's Bath Victorian Ball was natural form (1876-9, with some squidge on either side), but we were allowed to go slightly earlier. Even though I was making a new gown, I opted for the latter option because 1) I loathe natural form, with a couple of exceptions, 2) I didn't have enough fabric to do a natural form gown, which tend to be cut with shoulder-to-floor seams rather than bodice-and-skirt construction, and tend to use one or two fabrics rather than multiple fabrics and trims, and 3) early 1870s floofiness is one of the. best. things. ever. So I planned an 1875 gown, which was right on the edge between the ridiculous bustles of the early 1870s, and the deflated look that came in right after.
I should note that there were tons of ladies at the ball who made natural form look fantastic, and who made stunning, drool-worthy gowns. Just not for me, especially if I'm buying silk for it!
I started squirreling away fabric for this gown about three years ago. I had three yards of this and two yards of that, and so on - about 6 different types of silk taffeta and brocade, in the end, plus a few smaller scraps that I used for trim. The light pink bias-cut edging and cording that appears all over the gown is from three different pieces of fabric, that are mostly - but not quite - the same shade. Just had to be careful where I put them! All of these disparate pieces were not suitable for an elegant, long-line natural form gown, but they could definitely be cobbled into a ridiculous c.1875 confection!
Here are some of my references:
 |
| 1870s Fashion Plate, provenance unknown |
 |
| Ms Sophie Croizette, 1870s Victoria & Albert Museum |
 |
| Fashion plate, Revue de la Mode, 1873 |
 |
| Striped silk dress, c.1870, Philadelphia Museum of Art |

I chose the one in the bottom left, due to fabric allowances. My main fabric was a gold/tan silk taffeta with some figured gold brocade stripes in it, of which there is a photo in the top corner of my design image. It's remarkably similar to the fabric in this 1880s dress, although my brocade repeats are narrower:
 |
| Gown, 1880s, Augusta Auctions |
So that was the plan. I started with the bodice, using my basic Victorian bodice block and designing the skirts for it with an awkward combination of drafting and self-draping. I cut it in good fabric literally the day I left to fly to Canada for Christmas, so that I wouldn't have to take all 7 yards of it with me! Sorry for the horrendous quality of this photo; I was in a rush.

I did my best to pattern-match across the pieces, although obviously you can't do that completely on a curve. It worked pretty well. Un-matched stripes are totally period, though.

Here's the bodice after the first fitting in good fabric, and with some of the trim on the 'dagged' or 'vandyked' bottom edge, which was a fashionable style in the '70s (see the red and gold gown above).

At this point not all the boning was in, so the bodice was wrinkling over the hips and not quite sitting right in back. However, I was quite pleased with the trim - it took SO LONG, but it was exactly what I'd had in my head.

The inside took quite a bit of taming, especially along the hip-curves, but eventually both the seam allowances and the wrinkles on the hips decided to cooperate. I used the really thin zip-ties for most of the boning in this, by the way. There are narrow steels at the centre-back lacing, but that's it. Zip ties are cheap, and the ability of the plastic to take on a shape when you add some heat is much more reminiscent of whalebone than even spiral steels are. So there's a good argument for using plastic. They're not seen on the outside, so I care more about the properties of the material than the look of it, in this case. Steel or extra-strong plastic at the centre-backs is essential, though, to keep them from warping under the pressure of the lacing.
Next up was the bertha. My two main inspirations were these:
 |
| Gown, c.1865, Metropolitan Museum of Art |
 |
| This one is a pinterest orphan :( |
I really liked the 'windowpane' effect of the gauze through the ribbons, and I happened to have some very fine silk gauze laying around - I'd vowed never to use it because it was so impossible to cut on the grain, hem, or even touch without snagging, but it was perfect for this!
To make the pattern, I laced my corset around two pillows and then put the bodice on over that - not ideal, but it worked. Also, sorry in advance that a lot of these are instagram shots - I switched hard drives and transferred loads of stuff between computers, and I can't currently figure out where the original photos of these ended up. :(
 |
| That's the two-pillows-and-a-corset dress form in the bottom right |
 |
| The taming of the gauze |

Despite using a ton of gauze, mine ended up somehow...flatter...than the original. But it was hell to work with, so I'm leaving it as-is, forever.

Here it is at the final fitting, with sleeves. Obviously the hip-bits need some oomph under them to stop them from wrinkling and drooping. I'm not in love with the sleeves. I'd hoped to mess with them before the ball, but I didn't have time. They fit the slightly neo-medieval dagged-and-windowpane aesthetic, but they're a little...fake Rapunzel?...I'm not sure.
 |
| Adding the eyelets using an original mother-of-pearl awl that I found for £3 at a thrift shop. |
At this point we were only about a month from the ball, and I was panicking slightly as I moved on to the skirt.
I used a Janet Arnold pattern for the skirt, but it was for a day-dress, so I added a train. But why not use the handy 1870s floofy ball gown skirt with a train that she includes, you ask? Well. Mini side-rant.
Fun fact: that famous 1870s gown pattern, with the button-up front of the bodice and the nice trained skirt? The original dressmaker cut it wrong, with the bias at the front edge of the skirt panels, rather than the back edge. Janet Arnold does acknowledge this in the fine print on the pattern, but it's not immediately obvious as a problem if you don't already know about the bias-towards-the-back rule. Weirdly, although bias grain is notoriously (and usefully) stretchy and loses its shape, when it's worked into a seam, it's actually much more 'aggressive' than a straight-of-grain edge, because all the fibres in the weave are hitting the seam at an angle, whereas on the straight-of-grain side of the seam, half the fibres are hitting the seam dead-on, but the other half are perpendicular and not hitting it at all. This means that a bias edge will always push a straight edge away from itself. Thus, if the bias edges on your skirt panels are on the back-facing edge of each panel, they will naturally push the volume of the skirt around the body towards the back. This creates more pleasing folds and flutes in the drape of the skirt, and is a principle you can see clearly in dressmaking throughout the nineteenth century. When it is cut as-is, with the bias towards the front, the skirt will never quite fall the way most skirts of the period are meant to.
I've still seen some really beautiful renditions of that dress, both with and without changing the direction of the skirt panels. However, where the bias is not switched, many of the successful gowns I've seen are, like the original gown itself, made in lightweight fabrics - silk-cottons, thin satin, gauze, and so on. These fabrics move and drape naturally, so the fluting looks elegant and intentional. However, my gown was to be made in stiff silk taffeta, flat-lined with even stiffer cotton organdy, and weighed down with multiple layers of taffeta ruffles. When faced with this much heavier and stiffer set of materials, the problems with the grain would have become much more visible, and there would have been clear folds and droops in the skirt that fell towards the front - that is, in towards my legs - rather than being held out towards the back as desired. I personally didn't feel like fighting with the pattern, so I chose a day gown with simpler panels and just added a train.
 |
| This is the culprit. You can see from the stripes that the bias is on the wrong side of the skirt panels. |
Anyways.
I made the skirt in a plain tan 'taffetioni' in the front (who coined that term? Was it Lauren? It's great. I use it for any dupioni/shantung - that is, a slubby plain weave - that has few enough slubs that it can mostly pass for taffeta), and just a cotton sateen in the back, since that was all going to be covered with silk panels anyways. The whole thing was flatlined in cotton organdy for stiffness and body, bound with twill tape rather than being hemmed (another common period practice), and finished on the inside with a cotton organdy ruffle at the bottom edge, which is also something you see on lots of originals. It helps to keep the bottom of the skirt from folding in on itself, and serves as both a dust ruffle and a bit of protection between the floor and your nice fabrics.
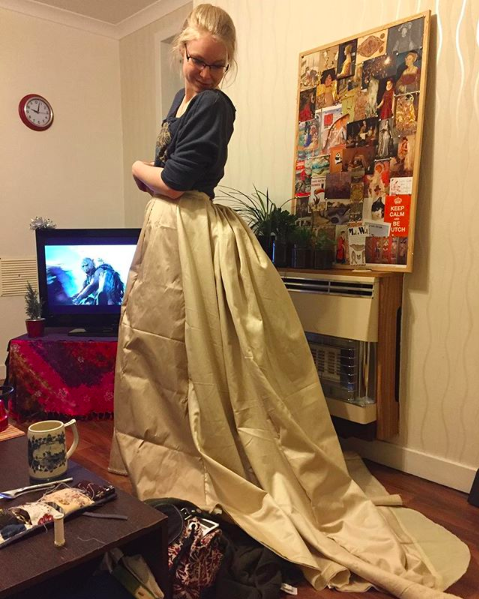 |
| I wish to thank the orcs of Mordor for their assistance with this stage of the gown sewing process. |

Here is the skirt with some of the silk added. The gold and pink silk ruffle around the bottom was actually one of the very first things I did as prep for this dress, and it took probably as long as making the base bodice and skirt combined. Seriously, it took SO LONG, you guys. I did it all by hand with vinegar and an iron, trying to knife-pleat as evenly as possible. The pink sections are accordion-pleated and then stitched together at the top, so that they fan out when I walk. The whole bottom edge of the ruffle is bound in a strip of pink silk, which in itself took forever because I stupidly sewed it by hand! Why? Why did I do that? They had machines in the 1870s!
For the rest of the trim, though, I got smart. That is, I got a fluting iron.

Using it is really simple. You stick the base in the oven for a bit - I did 20 min to start, I think, and then 3 or 4 minutes to reheat whenever it started to cool down. I stuck mine on an oven mitt on the ironing board. Then you wet your fabric strip with a vinegar-water mixture, place it on the base, and roll the top piece over top to 'corrugate' the fabric. I recommend as much vinegar as you can stomach smelling (I did mine when I was sick and had a stuffed-up nose, which was, for once, ideal timing) and a trim width no wider than the fluting iron’s base. I tried to go over mine twice to get a double width, but it just ended up crunching the fabric weirdly and making the flutes wonky and uneven.

Here are the finished pieces of trim after being fluted and drying out. They remind me of those crepe streamers you used to see at grade-school birthday parties. I don't *think* I smelled like vinegar on the dance floor. :)
Next I made the apron bit and the various floopy bits and attached them all to the skirt.

That's literally the only in-progress shot I have of that. It was less than a week before the ball and there was so much still to do, so I was not really pausing for photos!


This is me, in Jimmy's old flat in Glasgow, on very little sleep, doing the final fitting before the ball. The super long floopy thing I'm holding in the top photo is one of the two pieces of trim that had yet to be gathered. I ended up doing that by hand on the drive down to Bath.

I found some square-toed shoes at a charity shop. They were a little small, so I opened up the back seam and used some more of that trusty light pink silk to extend them by about a 1/4". I also added some gold silk rosettes, also from my gown fabric. This was in the flat in Bath, the day before the ball!
In the end, unfortunately, I felt quite sick the day of the ball. I had aching shoulders and neck before I even put the ballgown on (a common problem for me), and I ended up with a headache by half way through the evening. I also had a nasty stomach ache, probably from anxiety and not sleeping. This is why you finish your dresses earlier, folks! But we did get some good photos.


There are the back tiers I didn't show you earlier. :) I need to make another petticoat to fluff it up more; I've two organdy petticoats and a lobster-tail bustle under there, but it's still not enough. MORE PETTICOATS ALWAYS.
The photos above are by Raven Stern. I guarded her camera during one of the dances I sat out, resulting in this strange shot:

Also, this was the first Victorian ball that I went to with James, which meant it was finally time for the suit of tails to shine! That's the suit of tails that I made back in my third year of undergrad, but never finalised because I didn't have someone who would actually want to wear it. Well, it was worth the wait. It fit James perfectly, so I just needed to sew the back seam on the trousers, hem the legs, finish some of the linings, finish the insides of the sleeves and armholes, add buttons, and take out all the basting.

And here we are at the ball:

 |
| gross |

I'll also include some photos of the tailcoat in progress, below. These are now quite a number of years old, and unfortunately I don't have any better ones, as I did most of the tailcoat sewing during the late evenings and all-nighters pulled between paper deadlines for history courses. Amazing it came out this well, really. It's all hand-stitched, and the photos show how many layers and components go into this type of tailoring.
 |
| The inside, with the horsehair canvas and a layer of wool felt visible. There is a second layer of canvas and a layer of soft buckram underneath the visible horsehair canvas. |
 |
| A close-up of the front padding. The pad-stitching has been begun along the lapel. It has already been completed on the underside of the felt - this step must be completed before the felt is attached, via catch-stitch, to the canvas. |
 |
| What all of this looks like from the right side. The fabric is wool barathea. |
 |
| Once all the layers of stiffening are added to the fronts, the wool facing on the lapel and the first panel of lining go in. The tails are also interlined at this point; pockets will be added to the tails before the lining goes in. |
 |
| Again, from the right side, showing all the basting stitches and guiding marks. |
 |
| This is a cross-section of the shoulder, with the sleeve and body sandwiched together before being sewn. The body is on the left in this photo, and the sleeve on the right. In order, the layers are: sleeve lining (far right striped fabric, before being set in), sleeve roll padding, wool barathea sleeve, wool barathea body, horsehair canvas layers x2 (chest and body padding), soft buckram (ditto), wool felt (ditto), shoulder pad, body lining. The sleeve lining gets pulled up over all of it and tacked down to cleanly finish the inside, and then you barely know there’s so much bulk hidden in there! |
 |
| Traditional last photo of the night |
~~~
The next morning we went to the Pump Rooms for breakfast, and wandered around Bath. I went as a suffragette, c.1907, but I think I'll save that for a separate post - this one is fairly image-heavy as it is.
I'm hoping to make an extra petticoat or two for the ballgown and then do a photoshoot with James in one of the historical houses near Edinburgh, so stay tuned!


