Showing posts with label progress. Show all posts

Saturday, 30 July 2016

Updates on the Tudor Kirtle

A few weeks ago I made some updates to my Tudor kirtle before heading to Newark Castle in Port Glasgow, a sixteenth-century manor house which has survived and been partially restored inside.

The main update consisted of beginning the process of lining the skirt with fur. I'm using cheap old thrift coats for this, and I've only gotten my hands on one so far, so only the back part of the skirt is lined. However, it already creates a nice effect!

The image on the left is from the Book of Hours of Henry VIII (c. 1500), f. 182v. 

I had a bunch of fun wandering around the castle, and had a chance to sing Henry VIII's 'Pastime With Good Company' in the restored main hall. Here's a video:


I plan to line the skirt all the way up the back, and at least half of the front, because at the moment the heavy weight just at the bottom of the skirt is putting a lot of stress on the point where it attaches to the bodice. I think that having the fur rolled into the pleats will help distribute the weight.

I'm a little torn between keeping the fur in the kirtle, now that I've put it in, and saving it for a future gown skirt and re-lining the kirtle with some wool or linen. I might do the latter, simply because the fur is precious. Or I could have both the gown and kirtle lined with fur... The main idea with lining the kirtle in fur was that it will protect the train as it drags on the ground, since fur is easier to wipe down than nice wool and velvet.

But anyway, here are some photos. =)


In the restored hall.


This is in the older, 15th century part of the castle.

My straps started to fall down, and I left them because I was getting a headache. Alas.

The castle, in the midst of modern construction around it.


Monday, 1 February 2016

Bath Ball Beetlewing Bodice

Once again, it's been forever since I've posted! Sorry about that. I post updates a lot more frequently on my facebook page and my instagram, but all the finished dress diaries will still go here. =)

I've just finished making the bodice for my c. 1847-50 ball gown, which will be embellished with jewel beetle wings (called elytra) and worn to the annual Victorian Ball in Bath at the beginning of May. I am basing my gown on a couple of extant ones at the KCI and on some fashion plates.

First of all, here's my finished bodice, worn with a random 18th century petticoat over my corded petticoat for the full-skirted effect. It's hand-stitched in silk thread, made of cotton, and edged with figured silk organza. I draped the pattern on myself, with fitting help and photos courtesy of my good friend Emma. (Thank you!!)


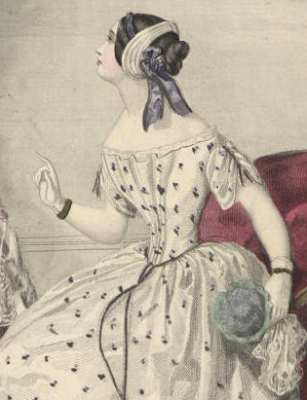
Now for some inspiration images. First of all, a great, great many further images can be found on my pinboard for this project, including extant pieces, more fashion plates, patterns, etc.

The dress on the left is at the Kyoto Costume Institute; I'm not sure where the one on the right ended up.
The photo is from the Cora Ginsburg LLC catalogue, 2000, p. 23.

Now, there were a lot of potential ways to pleat the bodice, but I fell in love with this Worth 1867 ball gown (it's at the Royal Ontario Museum, where I spent a large amount of my childhood) and wondered whether the pleat style had been used earlier.

Unfortunately, the image link doesn't work anymore...

Of course there are many, many fan-fronted gowns in the 1840s and '50s, but they're usually caught back into a yoke at the neckline. However, I started to find a variety of gowns with a similar pleated or even cowl-neck front which started as a fan at the waist and then never got pulled back into a yoke. There are a lot of examples on my pinboard from the 1840s and '50s, but I'll copy one here from 1846:

A detail from the plate at left
February 1846, from the Met's digital collections


Of course, you'll notice that mine is pleated a lot more like the 1860s one, with defined pleats rather than rounded rolls. I tried to keep them rounded, but the cotton didn't want to support itself unless it was pressed into a pleat, and then they sort of got permanently pressed down as I stitched them onto the structural layer of the bodice. So there it is. I like how it looks and I'll live with the slight anachronism.

So on to the construction. I began with a sketch of the design, and a fitting over my new corset. The original pattern was modified from the 1840s bodice mockup I made for a different dress last year (it never got past mockup stage, and the fabric is still in Canada), which was done over my 1890s corset as that's all I had at the time. So it needed a bit of tweaking.

I built a full bodice, with cotton lining and a sheer cotton over-layer, and finished the neck edge with piping and silk habotai trim. I then laced my corset around my rolled-up pillow and pinned the bodice over it so that I could drape the pleated layer on top.


I stitched the pleats down over the foundational layer and then edged the neckline with a strip of figured silk organza. This organza also appears on my c. 1815 ball gown, and I have a lot left, so it will probably show up on everything for a while. It's gorgeous stuff though!

I also made some corded piping out of the silk organza, and used it to edge the bottom of the bodice. I then added a strip around the waist like a belt, which you see in quite a few fashion plates. I think it will help define the waist in a sea of frothy ivory.


I procrastinated forever on draping the sleeves, which ended up being kind of curved rectangle-trapezoid things. Not that difficult. =P I stitched the pleating invisibly from the underside and added a further detail in the organza. I'll also add some beetle wings to this detail when I get to the embroidery stage.


There are bones on each seam on the inside, wool-stuffed pads in the side-bust/armscye areas to prevent buckling, and a waist tape to relieve pressure on the outer fabric. The bodice closes with waaaay too many hooks and eyes up the back, and, as on period bodices, the eyes have been individually thread-wrapped in silk thread to hide them and help keep them from slipping open.

This serves as my entry for February: Tucks and Pleats for the HSF/HSM, so here is the HSF info:

What the item is: c. 1847-50 ballgown bodice. This is the first step in the ballgown I'm making for the Bath Victorian Ball in May, and it is based on extant beetlewing-embellished gowns from the late '40s to c. 1850, as well as a variety of fashion plates. I chose this style of gown both because beetlewings are wonderful and because the gowns tended to be made of cotton, rather than silk, which I can afford. smile emoticon
The Challenge: February - Tucks and Pleating (and, if I'm honest, January - Procrastination...I left it for way too long before drafting the sleeves. And they're basically curved rectangles.)
Fabric/Materials: Bodice lining is cotton twill. Bodice outer layers are cotton muslin. Gold trim is figured silk organza. Piping is the silk organza with a cotton core. Under-trim on the neckline is silk habotai. Wool batting (meant for spinning) quilted into cotton twill pads in the side-bust/underarm.
Pattern: draped by me, on me, based on period sources and extant bodices.
Year: c. 1847-50.
Notions: Hook and eye closures (so many of them...) individually thread-wrapped with silk thread; silk thread for the stitching; cotton cord to fill the piping; bones (some steel and some extra-thin cable ties); wool top/batting for the side-bust pads.
How historically accurate is it? The cable ties are not accurate, but they mimic very thin whalebone pretty well. The pleats should be a little softer and rounder for the '40s and '50s, but they creased when I was draping them and that seems to be permanent. There are a bunch of extant pleated ones from the '60s, so I'm calling it okay. One of the bones in the back of the bodice goes too high - it reaches up past the armscye - which was necessary to fix the buckling in that area. I should have interlined it in a stiffer glazed linen or cotton; I know for next time. The rest of the materials and construction methods are accurate according to my research, and the stitching has all been done by hand in silk thread. So maybe 80%?
Hours to complete: haaaaaaah...
First worn: Just for photos. Its first official outing will be at the ball in Bath in May.
Total cost: I think about £20 for all the cotton (including skirts). The bones and the organza were stash; I think the bones were originally about £7 total and the organza is negligible because I used so little of it. The cotton interlining was also stash, and was originally free (excess from a class project in my undergrad).

I will leave you with some closer photos of the finished bodice, and a shot of the beetle wings that will eventually be stitched all around the skirt hem. =)


Thursday, 26 March 2015

Corset try-on, and TV show musings

Half-done the flossing (well, maybe more like 2/3...woops. Meant to do a fitting before this). Before I finish flossing and binding it and go past the point of no return, I wanted to do a quick try-on to make sure that everything was as it should be.

It fits great, and so far it's very comfortable! There's about a 4" lacing gap in back, which is fine - it's the end of the day, and I can usually lace down about 1" further if I do it in the morning, and lacing gaps tend to shrink as a corset gets broken in. So as long as I remember to put it on periodically and mold the fibers by wearing it for an hour or two, it will fit better and better.


My main concern was that the only available busk was about 1" longer than I'd have strictly preferred, and I was worried that it would be uncomfortable to sit. But all is good!

You'll have to excuse the awful selfies; there was no one else home to take photos. =P Thank goodness for split busks! I had to put in two laces to get it wide enough to do myself, though. >.>


I forgot to measure the waist when it was on, so the final reduction measurement will have to wait. Probably around 3-4" on the outside.

Anyways, more flossing tomorrow and then binding, and it's done!


Sunday, 22 March 2015

Corset progress and some natural dyeing

Well, I'm about 3 weeks late on HSF February: Blue, but I'm still plugging away. Here's what the corset looks like now (although I've actually finished removing all that white basting since taking the photo).


This is the first photo I've managed to take which is actually true to the fabric colour; all the others have turned out either way too navy or way too purple. It matches my inspiration corset very well. I'm hoping to finish the boning channels tonight, set grommets in tomorrow, and then do the bindings and the flossing later this week. That might be a bit of a pipe dream, though. We'll see how it goes.

In other news, dye class has finally turned its attention to natural dyes, and I've managed to wrangle an 18th century-colour-recreation element into the fairly strict parameters of the final project. In the mean time I've been sneaking little bundles of merino embroidery/lace-weight yarn into each of the class sample dye baths, to build up my library of natural-dyed embroidery flosses.

Clockwise from top left: onion skins, tea bags (very high concentration), cutch, lac, quebracho, orange marigold flowers.
I'm now collecting images on pinterest of embroidered petticoats, quilted petticoats, jumps, and aprons. I think I'm going to dye some combination of silk yardage and flosses in order to make a couple of petticoat projects. The only problem is that all the silk petticoats are embroidered in silk floss (of course), and only linen petticoats seem to get wool crewelwork - and this seem to be with fairly chunky yarns. My merino floss is a very thin, light 2-ply, with a fair bit of sheen, and actually resembles my spun silk yarn more than the wool embroidery flosses I'm seeing. I may end up dyeing both the merino and the spun silk (filament silk is better, but I can't afford it), and making several petticoats. So far, the plan is:

- Weld over-dyed with indigo for some emerald green silk yardage, to be used for a quilted petticoat based the one in Dalhousie's collection (which is currently my blog background image)
- Unknown dyestuffs for some "London Red" silk yardage, to be used as ribbons/puffs on caps, bonnets, and sundry accessories
- A selection of period colours in both wool and silk flosses, in order to embroider a petticoat/several petticoats/jumps/an apron/whatever I end up with enough floss of the correct fiber type to make.

Anyways, things to think about. If anyone has two cents to add about 18th century embroidery in wool or silk, natural dyestuffs, fun things to embroider (things which will be seen, preferably - I'm not embroidering pockets and under-petticoats until the outer stuff is entirely encrusted in polychrome wonder), or other embroidery/dyeing-related advice, I welcome your input!

Sunday, 22 February 2015

HSF February: Blue - Mid-Victorian Corset

Now that the Regency ball is done, I've had time to work on my next project: an 1876 corset of blue silk, inspired by this one from the 1850s:


Now, obviously this corset is from the 1850s, and mine is from the 1870s, and I'll also be wearing it under my 1840s gown. Unfortunately I am a student and I don't have the resources to make as many corsets as I would really like to, so this is the way it has to be. The shape of the 1870s corset is quite similar to that of the earlier versions, and I've modified it a bit in order to get it closer to the intended silhouette. Moreover, the construction is not so different: it, like the 1850s corset above, has two bust gussets, a dip at the center front bustline, deep, low hips with a lot of flare, and a sharp curve in at the waist. I unfortunately don't have the bust required to pull off such a beautifully curvy silhouette, and my bust gussets can't extend so far down towards the waist, but there's evidence for shorter gussets, too, in corsets of all the periods I mentioned.

It is re-drafted from a pattern in the 1876 issue of De Gracieuse, which is all in Dutch and lacks a high-resolution pattern online. Yay! (It's the bottom left-hand corset in the image linked above, but it won't be as long in front and it won't be quite so curvy at the bust - in fact, it will look a little more like the bottom right-hand corset.) Before the Automobile has actually made the same corset in the past, but I think our two versions will come out looking significantly different. It's always interesting to see how the same pattern morphs and changes on different body types.

I don't have photos of the mockup on me, but here are shots of it lying flat:


As you can see, I had to extend the waist a fair bit (about 2.5", actually - but I think I might take a half inch out again and extend it up at the top instead) as I have quite a long torso, both in modern terms and compared with smaller Victorian dimensions. I only extended it on one side, because I still need to cut a proper mockup in coutil, bone it with actual bones instead of loosely-stitched-on cable ties, and use a busk and full-length lacing (the only lacing strips I had on hand are very short).

Thus, I consider this part way between a draping session and a first mockup - it was really just to get the pattern right, and now I'll begin actually fitting it.

Mockup 2.0 will be done in coutil with some sort of plain-weave fashion fabric because this is the only way to get a really accurate read on how the final corset will behave. Like the final corset, the pieces will be roll-basted into slightly domed shapes before being stitched together, to help them conform to the curves required of them without wrinkling.

I believe I underestimated the time this will take, as my last corset was the red 1890s, which had no gussets and thus needed only one mockup after the initial re-drafting process. Altogether it took only a week from drafting to flossing; I've already spent three-ish days on this one. So it might not be done in time for February's challenge, but I'll give it a shot, and at least post my progress.

More soon!